지난 포스팅에서 안드로이드에서의 Layout 에 대해서 공부했다.
그리고 LinearLayout, RelativeLayout, FrameLayout, TableLayout, ConstraintLayout 등의 기본 Layout 들에 대해 아주 간단히 알아보았다.
일단 LinearLayout 부터 자세히 알아보도록 하자!!!!
이 포스팅은 다음 사이트를 참고하였다.
https://developer.android.com/reference/android/widget/LinearLayout
https://zion830.tistory.com/13
https://recipes4dev.tistory.com/89
LinearLayout

Linear 의 사전적 정의는 아래와 같다.
Linear : 직선의, 선으로 된, 직선 모양의, 선형의, 순차적
이름에서부터 뭔가 사용이 간편하고 표시 형태가 직관적일 것 같은 느낌이 나는 단어이다!
선형이라는 게 어떤 분야에서도 그러니까... ㅎ
LinearLayout에서는 사각형 박스 형태의 디스플레이 화면에 UI 요소들을 일렬로 배치할 수 있어 안정감있는 화면 구성이 가능하다.
거두절미하고 사용법부터 알아봅시다.
LinearLayout 사용 방법
기본 사용법
<LinearLayout >과 </LinearLayout> 사이에 View 위젯들을 선언하는 것만으로, 가로 방향 한줄로 나열된 View 위젯들을 확인할 수 있다.
<LinearLayout
...
>
<TextView
android:layout_width="wrap_content"
android:layout_height="wrap_content"
android:textSize="24sp"
android:background="#4CAF50"
android:id="@+id/text1"android:text="TEXT1" />
<TextView
android:layout_width="wrap_content"
android:layout_height="wrap_content"
android:textSize="24sp"
android:background="#FF9800"
android:id="@+id/text2"
android:text="TEXT2" />
<TextView
android:layout_width="wrap_content"
android:layout_height="wrap_content"
android:textSize="24sp"
android:background="#009688"
android:id="@+id/text3"
android:text="TEXT3" />
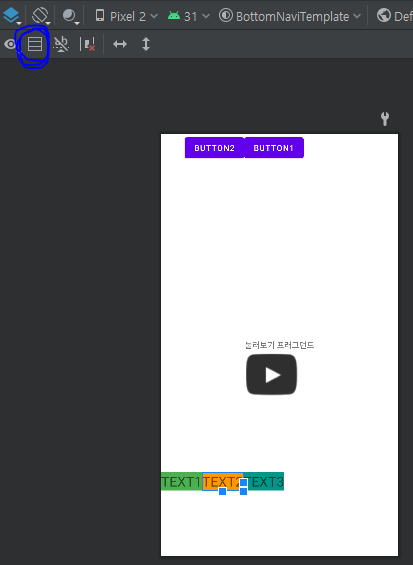
</LinearLayout>LinearLayout 뷰 그룹에 TextView 3개를 Horizontal 로 구성.

LinearLayout의 oreientation 속성을 사용하여 자식 View 위젯의 배치 방향(Vertical, Horizontial) 바꿀 수 있다.
    <TextView
        ...
        android:text="TEXT1" /><TextView
        ...
        android:text="TEXT2" /><TextView
        ...
        android:text="TEXT3" /></LinearLayout>
이 위젯의 배치 방향은 Design 모드에서 아래 사진의 파란색으로 표시된 버튼을 누르는 것만으로도 가능하다.
코드로 직접 orientation 이 Horozontal 혹은 Vertical 이라고 작성하는 것과 완전히 같은 동작을 하므로 원하는 대로 사용하면 됩니다!
가중치(weight)를 이용한 영역 분할
View 위젯들이 해당 Layout의 화면 가로(혹은 세로) 영역전체를 차지하도록 하기 위해서 weight를 이용할 수 있다.
LinearLayout 안에 들어가는 View 들에 가중치를 주면 View 들이 비율에 맞게 영역을 차지하게 된다.
가중치를 위한 속성.(layout_weight)
LinearLayout의 자식(Children) View 위젯에 가중치(weight)를 적용하기 위해서는 View 위젯에 "layout_weight" 속성 값을 지정하면 된다.
android:layout\_weight- 자식(Children) View 위젯이 차지하는 가중치(weight) 지정. (소수점 단위 사용 가능. (예. 1.2))
특정 단위가 아닌 전체에 대한 비율의 개념으로 사용하는 것이다. 지정하지 않았을 때의 기본 값은 0이다. (내용만큼의 크기 차지한다는 것이다.)
이 때 가중치가 적용되는 방향(width 또는 height)의 값이 "0dp"이어야 한다..
 <TextView
    android:layout_width="0dp"
            ...
    android:layout_weight="1"
    android:id="@+id/text1"
    android:text="TEXT1" />
<TextView
    android:layout_width="0dp"
            ...
    android:layout_weight="2"
    android:id="@+id/text2"
    android:text="TEXT2" />
<TextView
    android:layout_width="0dp"
        ...
    android:layout_weight="3"
    android:id="@+id/text3"
    android:text="TEXT3" />
```
각각 Layout 전체 크기의 1/6, 2/6, 3/6 만큼 차지하고 있는 것을 볼 수 있다.
만약 위젯들이 모두 같은 비율로 차지하게 만드려면 android:layout\_weight = "1" 로 모두 해주면 되겠죠?
또 아래와 같이 특정 위젯만 전체 가로영역에서 남는 부분을 차지하게도 할 수 있겠습니다.

TEXT1 은 width을 wrap\_content 로 주어서 텍스트 사이즈에 따라 크기가 변하게 설정하고 나머지 영역은 TEXT2 와 TEXT3 이 1 : 2 비율로 차지하게 만들었다.
*🤔그렇다면 만약 TEXT3 오른쪽 부분을 빈 공간으로 주고 싶다면 어떻게 해야 할까? 답은 아래에 있다.
*
LinearLayout의 일부 영역을 공백으로 남기는 방법

위 그림처럼 LinearLayout의 일부 영역을 공백으로 남기려면 전체영역을 10으로 만들어버리면 된다. 그렇게 하기 위해서는 LinearLayout 안의 View 에 각각 weight 을 지정하고 전체 LinearLayout 의 weightSum을 '자식 View 의 weight의 합 + 비우고 싶은 만큼의 비율값' 으로 주면 된다.
android:weightSum-LinearLayout의 최대 가중치(weight) 값 지정한다. (소수점 단위 사용 가능. (예. 1.2) )- 지정되지 않을 시 기본값은 합산된(sum) 가중치는 자식(Children) View들의 모든
layout\_weight값을 더하여 계산된다.
<LinearLayout
        android:layout_width="match_parent"
        android:layout_height="match_parent"
        android:orientation="horizontal"
        android:weightSum="10">

        <TextView
            android:layout_width="0dp"
            ...
            android:layout_weight="1"
            android:text="TEXT1" />

        <TextView
            android:layout_width="0dp"
            ...
            android:layout_weight="4"
            android:text="TEXT2" />

        <TextView
            android:layout_width="0dp"
            ...
            android:layout_weight="2"
            android:text="TEXT3" />

    </LinearLayout>
- LinearLayout : 한쪽 방향으로 차례대로 뷰를 추가하여 화면을 구성한다.
- 레이아웃은 ViewGroup을 상속받는다. 즉, 하나의 View처럼 작동할 수 있어 필요에 따라 다양한 종류의 레이아웃을 중첩해서 사용할 수 있다.
- 만들어야하는 화면에 따라 수평, 수직을 선택하면 된다. 기본값은 수평(Horizontal) 이다.
- Swift - iOS 에서 StackView 와 굉장히 비슷하다.
- 가중치를 설정하여 자식 View 들이 비례값으로 영역을 차지할 수 있다.
'Android > UI' 카테고리의 다른 글
| 안드로이드 Navigatioin Back Stack 없애기 (0) | 2023.05.17 |
|---|---|
| Android ViewPager2 간단히 뜯어보기 (0) | 2023.05.05 |
| ConstraintLayout (0) | 2022.08.30 |
| Android Layout (0) | 2022.08.29 |